记录下,PVE安装相关
1)安装时,注意分区容量
选择好磁盘以后建议点击右侧的【Options】自定义设置,将【hdsize】设为“64”,其它空白,这样 PVE 就只采用64GB的容量进行此次安装,剩余的空间自己可以后期调整。因为PVE安装后,对不同分区的容量进行扩容比较方便,但是减少容量就很麻烦。如果不限制64GB的空间的话,安装引导就会按照一定的比例帮你分配,可能的后果就是用于备份和镜像存放的空间分配得很多,实际上你根本用不到
出处:https://www.bilibili.com/read/cv17518961/
2)换源
SSH登录到pve后台,然后一条一条的执行命令
1、处理掉企业源
rm -rf /etc/apt/sources.list.d/pve-install-repo.list
echo "#deb https://enterprise.proxmox.com/debian/pve Bullseye pve-enterprise" > /etc/apt/sources.list.d/pve-enterprise.list
2、开始换源
wget https://mirrors.ustc.edu.cn/proxmox/debian/proxmox-release-bullseye.gpg -O /etc/apt/trusted.gpg.d/proxmox-release-bullseye.gpg
echo "deb https://mirrors.ustc.edu.cn/proxmox/debian/pve bullseye pve-no-subscription" > /etc/apt/sources.list.d/pve-no-subscription.list
echo "deb https://mirrors.ustc.edu.cn/proxmox/debian/ceph-pacific bullseye main" > /etc/apt/sources.list.d/ceph.list
sed -i.bak "s#http://download.proxmox.com/debian#https://mirrors.ustc.edu.cn/proxmox/debian#g" /usr/share/perl5/PVE/CLI/pveceph.pm
sed -i.bak "s#ftp.debian.org/debian#mirrors.aliyun.com/debian#g" /etc/apt/sources.list
sed -i "s#security.debian.org#mirrors.aliyun.com/debian-security#g" /etc/apt/sources.list
echo "deb http://download.proxmox.com/debian/pve bullseye pve-no-subscription" >> /etc/apt/sources.list
2、最后更新
apt update && apt dist-upgrade -y
3)调整CPU运行频率
参考:https://forum.proxmox.com/threads/fix-always-high-cpu-frequency-in-proxmox-host.84270/
1、安装acpi:
apt-get update && apt-get install acpi-support acpid acpi -y
2、修改/etc/default/grub
在GRUB_CMDLINE_LINUX_DEFAULT追加"intel_pstate=disable”,然后update-grub,然后reboot
注:该步骤可直接跳过,先做直通后,继续做下面步骤
3、调整CPU governor
echo "conservative" | tee /sys/devices/system/cpu/cpu*/cpufreq/scaling_governor
4、以下命令供参考
Check currently used governor:
cat /sys/devices/system/cpu/cpu*/cpufreq/scaling_governor
Check current clock speeds (once):
cat /sys/devices/system/cpu/cpu*/cpufreq/scaling_cur_freq
Check current clock speeds (continuous):
watch -n 1 cat /sys/devices/system/cpu/cpu*/cpufreq/scaling_cur_freq
Check available governors:
cat /sys/devices/system/cpu/cpu*/cpufreq/scaling_available_governors
Set governor, for example schedutil (temporary):
echo "schedutil" | tee /sys/devices/system/cpu/cpu*/cpufreq/scaling_governor
Set governor, for example conservative (permanent):
Open/Edit the crontab with: crontab -e and add the following in a new line at the bottom:
@reboot echo "conservative" | tee /sys/devices/system/cpu/cpu*/cpufreq/scaling_governor
4)直通
参考:https://foxi.buduanwang.vip/yj/561.html/
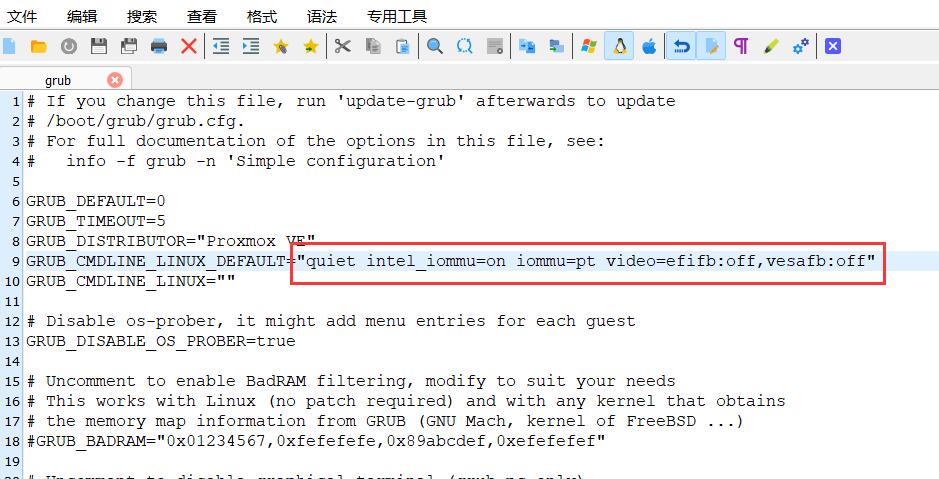
1、编辑GRUB配置文件:/etc/default/grub
其中,intel_pstate=disable是禁止intel_pstate使用acpi管理CPU电源,pcie_acs_override=downstream是解决多网口网卡在一个iommu组,导致不能分配给多个虚拟机
sed -i "s/quiet/quiet intel_iommu=on iommu=pt initcall_blacklist=sysfb_init intel_pstate=disable pcie_acs_override=downstream/g" /etc/default/grub
改好结果,仅供参考:
然后执行:
update-grub
2、添加所需的系统模块(驱动):/etc/modules
echo "vfio" >> /etc/modules

echo "vfio_iommu_type1" >> /etc/modules

echo "vfio_pci" >> /etc/modules

echo "vfio_virqfd" >> /etc/modules
改好结果:

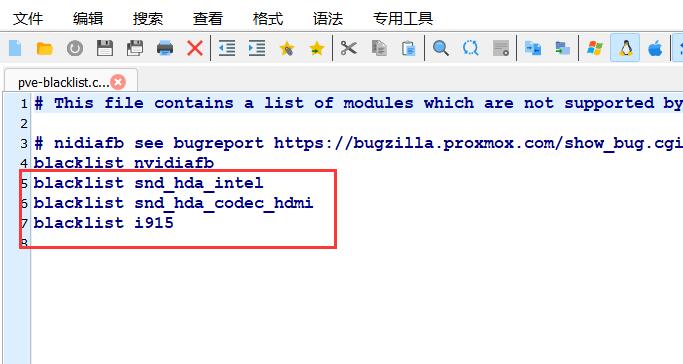
3、添加模块(驱动)黑名单:/etc/modprobe.d/pve-blacklist.conf
echo "blacklist snd_hda_intel" >> /etc/modprobe.d/pve-blacklist.conf

echo "blacklist snd_hda_codec_hdmi" >> /etc/modprobe.d/pve-blacklist.conf

echo "blacklist i915" >> /etc/modprobe.d/pve-blacklist.conf
改好结果:
4、查看GPU的ID:
lspci -nn | grep VGA

- 8086:1606 就是核显的ID
- 00:02.0 是核显的编号
接着执行:(ids=xxxx:xxxx,xxxx:xxxx替换成你获取的ID)
echo "options vfio-pci ids=8086:3e98" >> /etc/modprobe.d/vfio.conf
5、更新内核并重启:
执行:
update-initramfs -k all -u

reboot
6、验证是否开启iommu:
终端输入:
dmesg | grep 'remapping'
要出现:DMAR-IR: Enabled IRQ remapping in x2apic mode
接着用下面的命令:
find /sys/kernel/iommu_groups/ -type l
出现很多数据,每一行最后的xx:xx.x是设备编号,查看要直通的设备的编号是否在里面。
5)主界面追加显示信息
1、登录PVE的SSH,执行命令安装sensors:
apt update && apt-get install lm-sensors -y
2、探测下温度,执行:sensors-detect (一路yes,回车)
3、获取温度信息,执行:sensors
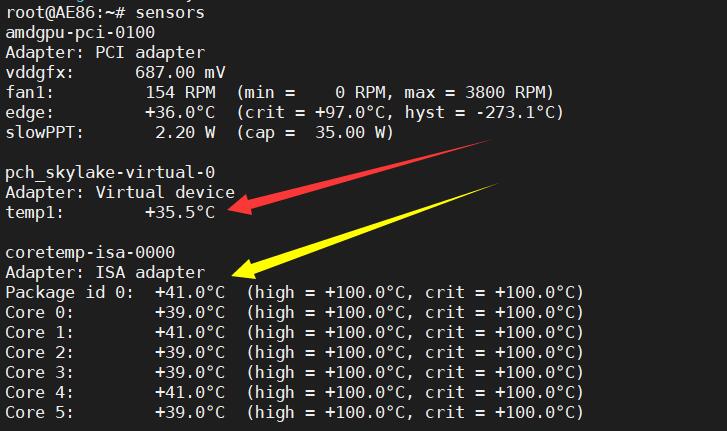
- 红色箭头:temp1这里是主板温度,可能某些主板还有temp2、temp3等
- 黄色箭头:Package id 0、core0~5这里是CPU温度,有多少个核心,就显示多少
4、定时检测smartinfo
每分钟检测一次,将直通的nvme硬盘的smartinfo写到根目录
apt update && apt-get install expect -y
crontab -e
*/1 * * * * /root/smartctl_via_ssh.sh
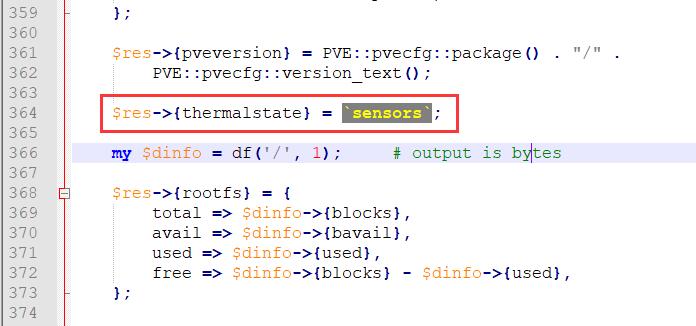
5、WinSCP登录到PVE,修改这个文件:/usr/share/perl5/PVE/API2/Nodes.pm
(我习惯于下载到本地用Notepad++修改)
搜索:$res->{pveversion} = PVE::pvecfg::package()
在这个定义的下方添加:
$res->{thermalstate} = `sensors`;
$res->{cpusensors} = `lscpu | grep MHz`;
$res->{nvmeinfo} = `cat smartinfo.log`;
结果如图:
修改完保存,然后塞回路径。
6、修改这个文件:/usr/share/pve-manager/js/pvemanagerlib.js (建议备份,万一自己改炸就不好了。)
(我习惯于下载到本地用Notepad++修改)
搜索PVE Manager Version
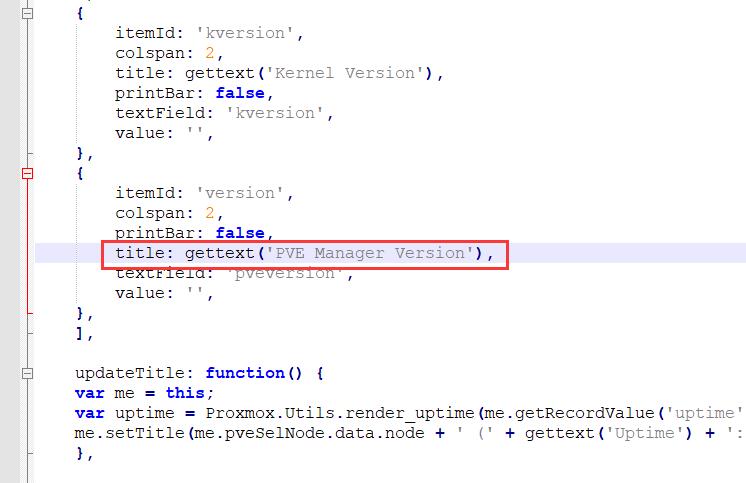
- 在这个定义的下方添加一个定义:
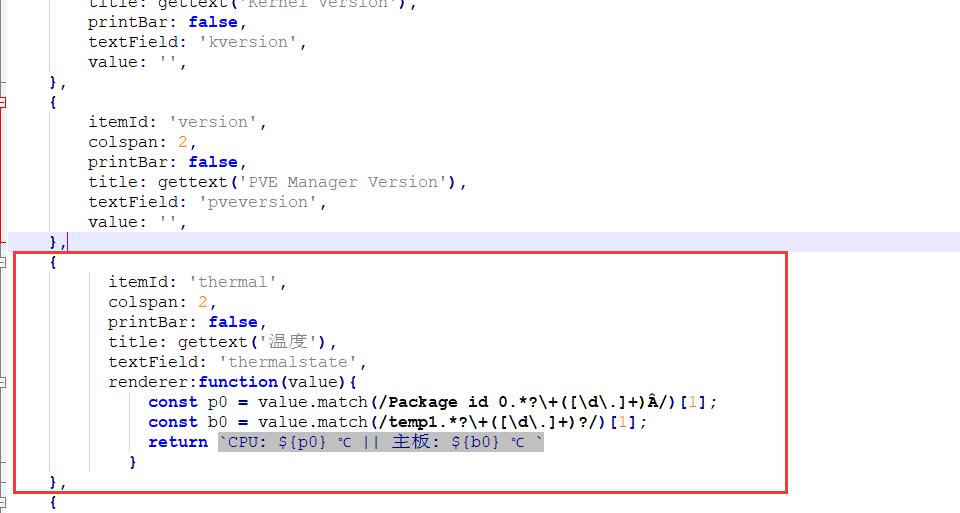
    {
          itemId: 'thermal',
          colspan: 2,
          printBar: false,
          title: gettext('Temperature'),
          textField: 'thermalstate',
          renderer:function(value){
              const p0 = value.match(/Package id 0.*?\+([\d\.]+)Â/)[1];
              const b0 = value.match(/temp1.*?\+([\d\.]+)?/)[1];
              return `CPU: ${p0} ℃ || mainboard: ${b0} ℃`
            }
    },
    {
          itemId: 'nvmeinfomation',
          colspan: 2,
          printBar: false,
          title: gettext('NVME info'),
          textField: 'nvmeinfo',
          renderer:function(value){
              const m0 = value.match(/nvme0Temperature.*?([\d]+)/)[1];
              const m1 = value.match(/nvme0Media.*?([\d]+)/)[1];
              const n0 = value.match(/nvme1Temperature Sensor 1.*?([\d]+)/)[1];
              const n1 = value.match(/nvme1Temperature Sensor 2.*?([\d]+)/)[1];
              const n2 = value.match(/nvme1Media.*?([\d]+)/)[1];
              return `nvme0: temp ${m0} ℃ | errors ${m1} || nvme1: temp1 ${n0} ℃ temp2 ${n1} ℃ | errors ${n2}`
            }
    },
    {
          itemId: 'MHz',
          colspan: 2,
          printBar: false,
          title: gettext('CPU frequency'),
          textField: 'cpusensors',
          renderer:function(value){
              const f0 = value.match(/CPU MHz.*?([\d]+)/)[1];
              const f1 = value.match(/CPU min MHz.*?([\d]+)/)[1];
              const f2 = value.match(/CPU max MHz.*?([\d]+)/)[1];
              return `realtime: ${f0} MHz | min: ${f1} MHz | max: ${f2} MHz`
            }
    },
结果如图:
- 上述是一种比较简单的万金油做法,有些人可能要把每个核心的温度有写出来,或者说有几个主板温度,也要一起写出来,那么就按照下列的格式:
    {
          itemId: 'thermal',
          colspan: 2,
          printBar: false,
          title: gettext('温度'),
          textField: 'thermalstate',
          renderer:function(value){
              const p0 = value.match(/Package id 0.*?\+([\d\.]+)Â/)[1];
              const c0 = value.match(/Core 0.*?\+([\d\.]+)Â/)[1];
              const c1 = value.match(/Core 1.*?\+([\d\.]+)Â/)[1];
              const c2 = value.match(/Core 2.*?\+([\d\.]+)Â/)[1];
              const c3 = value.match(/Core 3.*?\+([\d\.]+)Â/)[1];
              const c4 = value.match(/Core 4.*?\+([\d\.]+)Â/)[1];
              const c5 = value.match(/Core 5.*?\+([\d\.]+)Â/)[1];
              const b0 = value.match(/temp1.*?\+([\d\.]+)?/)[1];
              const b1 = value.match(/temp2.*?\+([\d\.]+)?/)[1];
              return `CPU: ${p0} ℃ || CPU1: ${c0} ℃ CPU2: ${c1} ℃ CPU3: ${c2} ℃ CPU4: ${c3} ℃ CPU5: ${c4} ℃ CPU6: ${c5} ℃ || 主板1: ${b0} ℃ 主板2: ${b1} ℃`
            }
    },
结果如图:
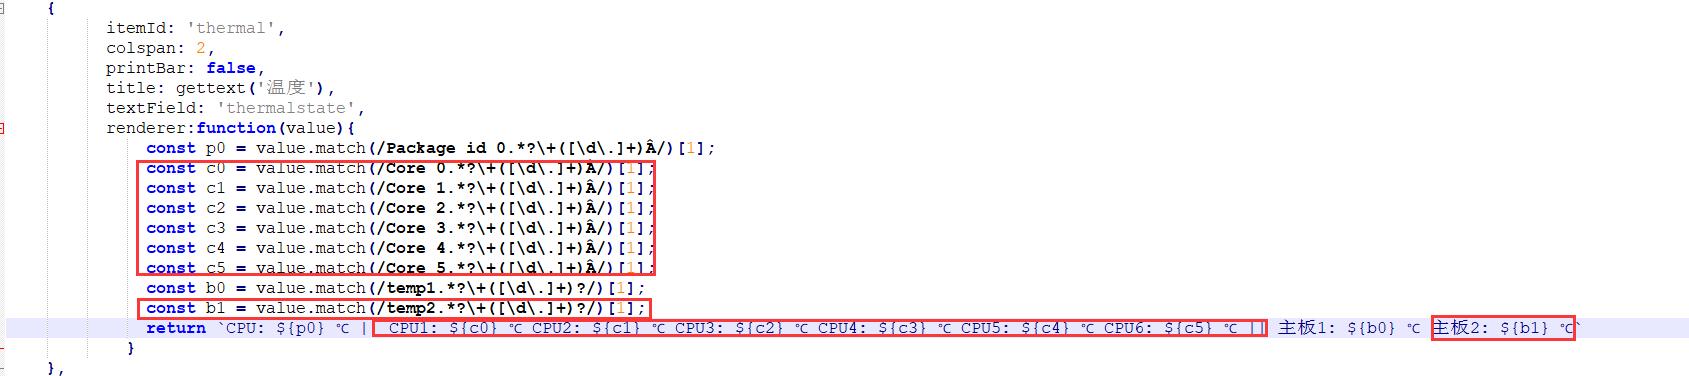
- 红框内就是单独每个核心或者每个主板温度
- 前面的CPU温度是综合温度,后面的CPU1~6是每个核心单独温度
- 可根据实际情况增减CPU温度或者主板温度
- 其实如果核心超过4个,不建议把每个核心温度写出来,不美观
7、修改页面高度
搜索/usr/share/pve-manager/js/pvemanagerlib.js中的关键字“widget.pveNodeStatus”以及“[logView]”,分别修改height为355、455
验证脚本
sed -n '/widget\.pveNodeStatus/,+5{/height/{p}}' /usr/share/pve-manager/js/pvemanagerlib.js
sed -n '/\[logView\]/,+5{/heigh/{p}}' /usr/share/pve-manager/js/pvemanagerlib.js
修改脚本
sed -i -r '/widget\.pveNodeStatus/,+5{/height/{s#[0-9]+#355#}}' /usr/share/pve-manager/js/pvemanagerlib.js
sed -i -r '/\[logView\]/,+5{/heigh/{s#[0-9]+#455#;}}' /usr/share/pve-manager/js/pvemanagerlib.js
8、改完执行 systemctl restart pveproxy 重进PVE主页,就看到温度显示了。
